| User Roles |  Staff contributor Staff contributor |  External contributor External contributor | ✗Pulse user |
This article explains how to use Insights, an additional Silverfin module that gives you a complete overview of data across all your client files. You’ll learn how to create and manage queries and automate actions with triggers.
Table of contents
- What is Insights module?
- What Are Queries and how to create them?
- Action button in a query
- Setting Up Triggers
What is Insights module?
Insights is an additional Silverfin module that gives you an overview of data across client files. It allows you to:
- Search for files that meet specific criteria
- Filter and retrieve data
- Receive automatic notifications about key situations
Insights consists of two parts:
- Insights tab: where you can create and run data searches (queries)
- Triggers tab: where you can automate Notes or To-dos on saved queries

If you don't have access to Triggers tab, contact your Customer Service Manager to enable full Insights module.
What Are Queries and how to create them?
A query is a customised search that allows you to find client files meeting specific criteria - for example, all files where the director’s loan balance exceeds a certain amount or where a workflow is not completed.
Accessing Queries
To view all available queries:
- Go to the Insights tab.
- Click See all firm queries.
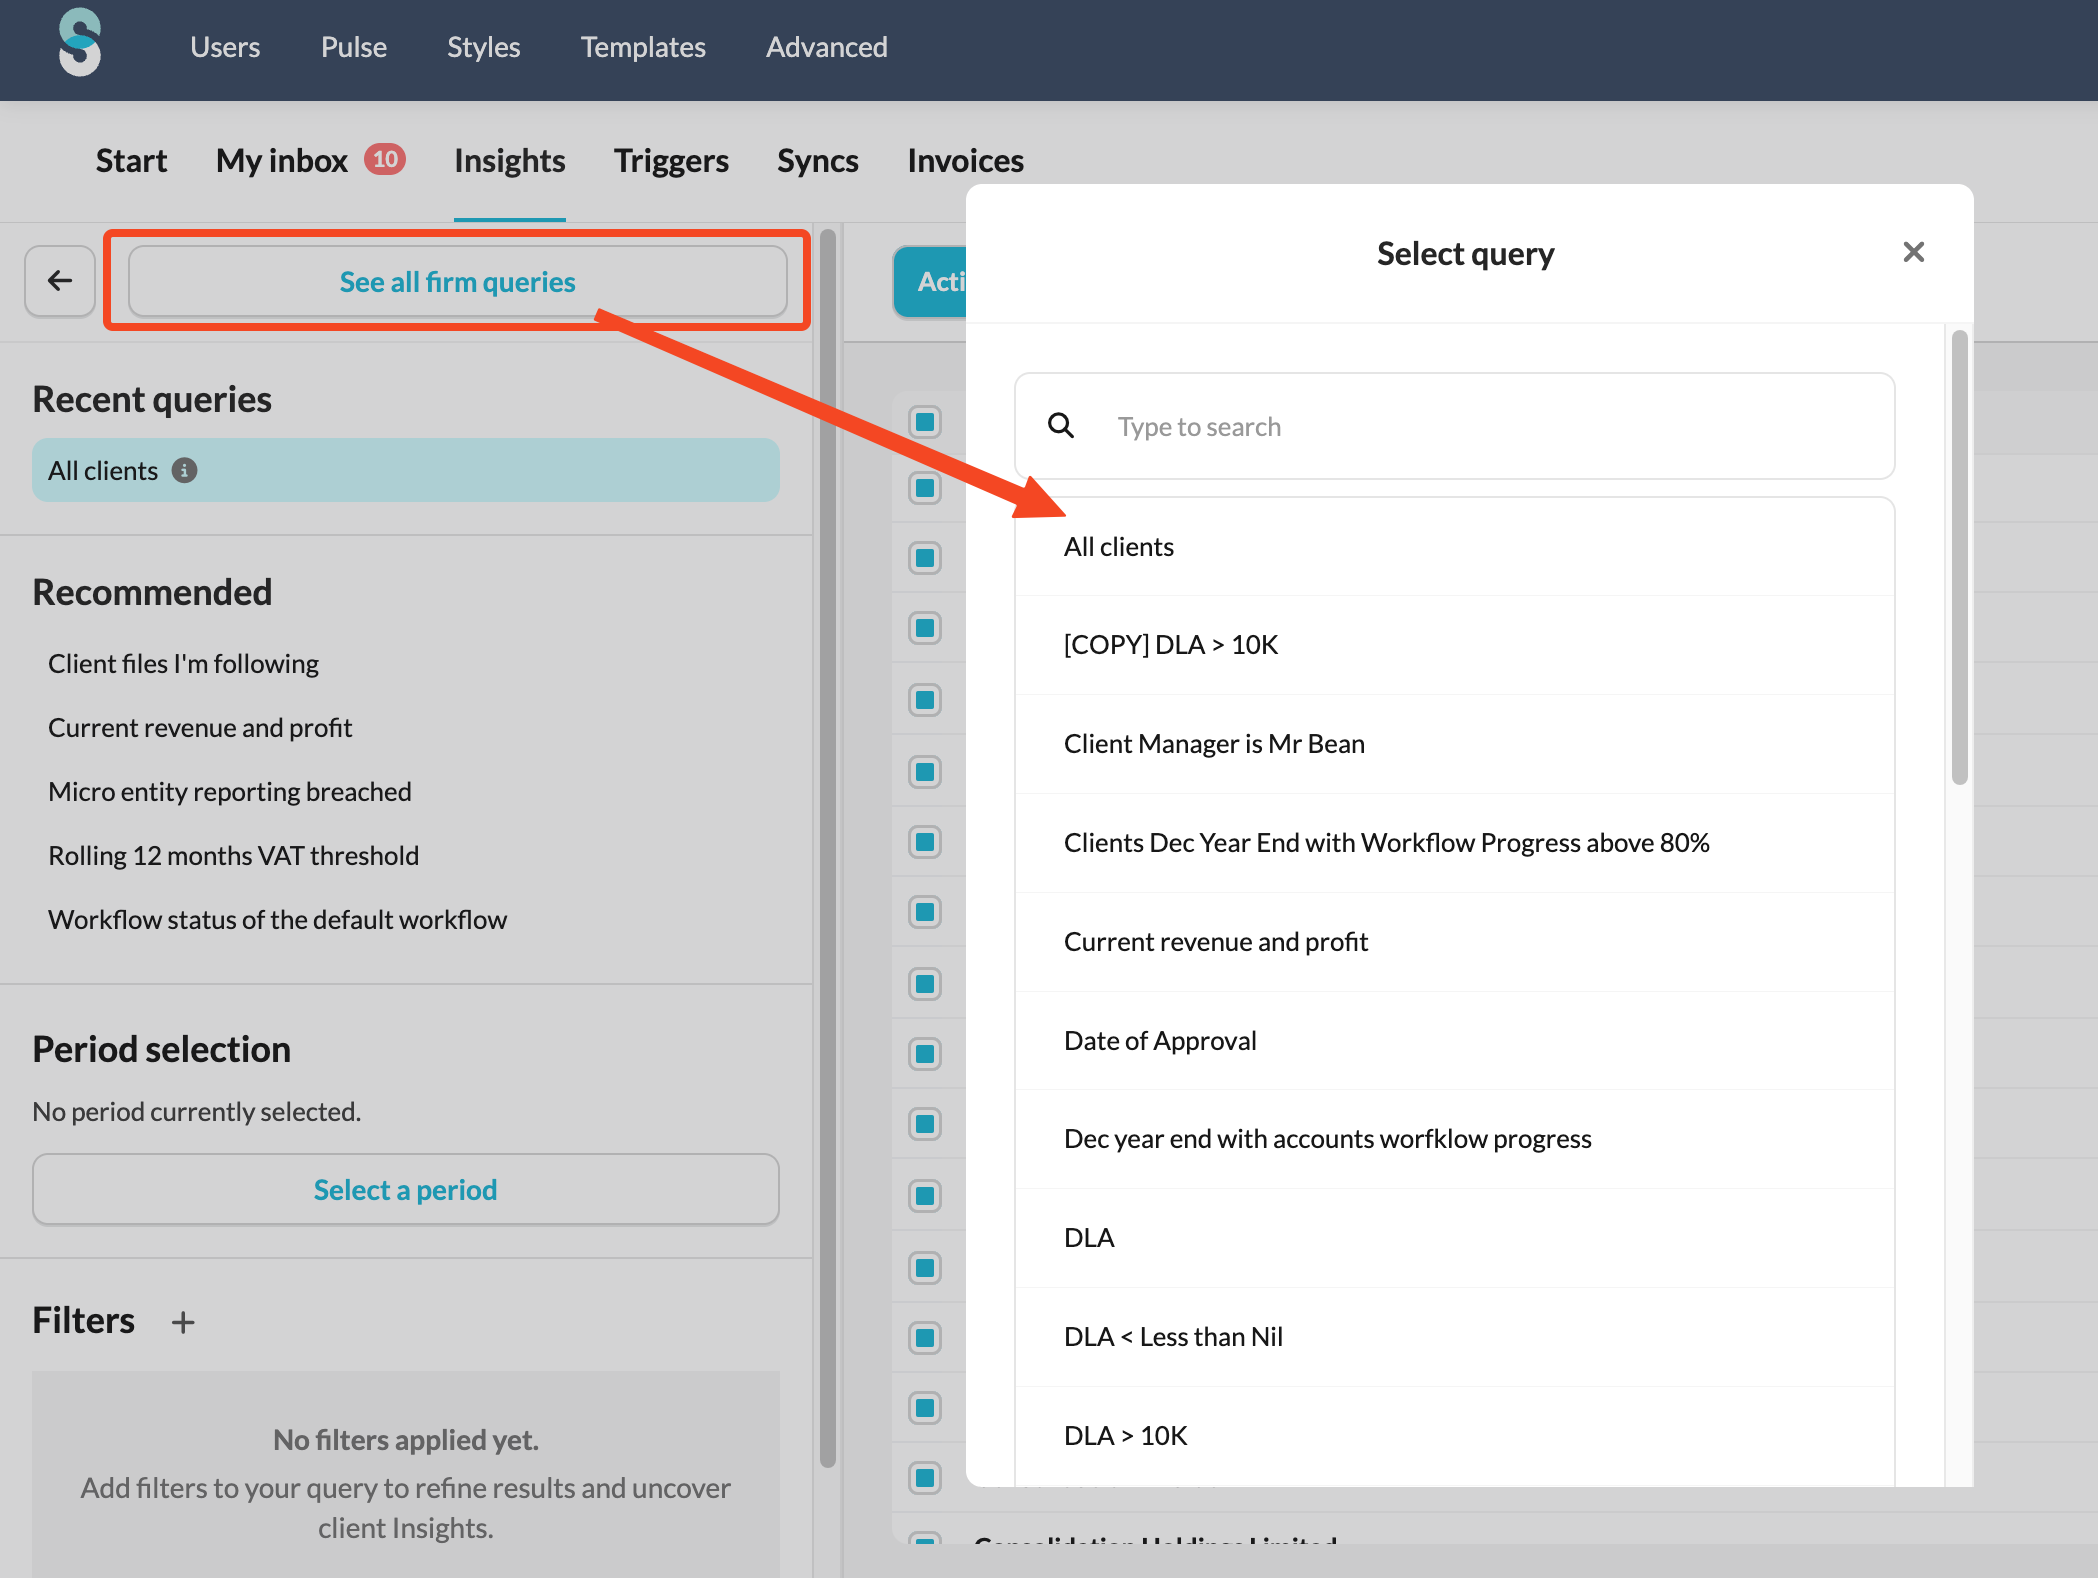
Here you’ll find:
- Queries created by admin users
- Queries available from the Silverfin Marketplace
- Queries you’ve recently created
- Queries recommended by Silverfin (Partner queries)
When you select a query, the filters and columns are automatically filled in, and the system retrieves the results. Depending on your data size, this may take a few moments.
Users without full Insights access can still use the recommended queries provided by Silverfin.
Creating and Saving Queries
Admin users, internal users, and external contributors can create and save their own queries. Visibility of queries depends on the user role in Silverfin.
- Queries created by admins can be made Private, Admin, or Firm-wide.
- Queries created by regular or external users are always Private.
Private Queries
- Visible only to the user who created them.
- Regular users and external contributors can only create Private queries.
Admin Queries
- Visible to all users with Admin rights within your firm.
- Can only be created and managed by Admin users.
Firm Queries
- Visible to all users in the firm.
- Perfect for queries that everyone can benefit from, such as compliance checks or workflow reviews.
- Only admins can create or change the visibility to “Firm”
Editing Query Visibility (for Admins)
Admin users can:
- Edit their own Private queries.
- Edit non-Partner Admin queries.
- Edit non-Partner Firm queries.
- However, they cannot downgrade the visibility of a query from Firm or Admin to Private.
This ensures firm-wide or admin-level queries remain available to all users who rely on them.
Partner queries are predefined and recommended by Silverfin.
These have their visibility permanently set to Firm and cannot be modified.
To create a query:
- Apply your preferred filters in the Insights tab. Read the following detailed article on how to set up filters in Insights.
- Customise your table view by rearranging or hiding columns to create your preferred layout. Each column has a settings dropdown menu that lets you move columns left or right to create your optimal view.

- Click Save as query.

- Click on the saved query and choose who should have access to it (if you’re an admin).

Good to know:
- The Insights module can only be used on client files that the user running the search has access to. Since the module is automatically linked to the user, different users may see different results based on their file access.
- Insights queries do not display results for an empty period - when no ledger has been created.
- Filters can be used in isolation or teamed up with other filters to create multi-layered insights.
- You can copy existing query by clicking on a button 'save a new query' and assign different visibility.
Action button in a query
The Action button in a query allows you to perform several bulk actions, depending on your user permissions.
Archiving a Workflow (Admin Users Only)
Admin users can archive workflows for multiple client files directly from the Actions menu in Insights.
To do this:
- Select the relevant client files in Insights.
- Click Actions.
- Choose Archive workflow.

- In the next screen, select the workflow you want to archive.
- Click Archive for [x] files to confirm.

Download as Excel
All users can use the action to download query results to excel for selected files.
To do this:
- Select the relevant client files in Insights.
- Click Actions.
- Choose Download as Excel.

- Save an Excel file on your computer.
Locking period (Admin Users Only)
Admin users can lock periods for multiple client files directly from the Actions menu in Insights.
To do this:
- Select the relevant client files in Insights.
- Click Actions.
- Choose Lock period. Note: Action is available only if period is determined in period selection.

- In the next screen, select the lock type you want on the next screen (lock or permanent lock).

- Click on ‘Lock for x files'.
Send a message
Action that allows users to send messages to multiple files simultaneously.
- Action available for all Insights users
- You can place Notes and To-dos directly where they’re needed - in the file overview or specific reconciliation templates.
To do this:
- Select the relevant client files in Insights.
- Click Actions.
- Choose Send a message. In Period selection, make sure the correct period is selected.

- Select where the message should be sent - client overview or reconciliation template.

Setting Up Triggers
- Once you’ve saved a query, you can attach a trigger to it.
- A trigger is an automated action that creates a note or to-do in client files that match your query’s criteria.
For example, you could automatically notify users when a workflow reaches 100% completion, or when a director’s loan exceeds £10,000. - Only Admin users can create or manage triggers.
How to Create a Trigger
- In the Insights tab, select the query you want to use.
- Click Add a trigger.
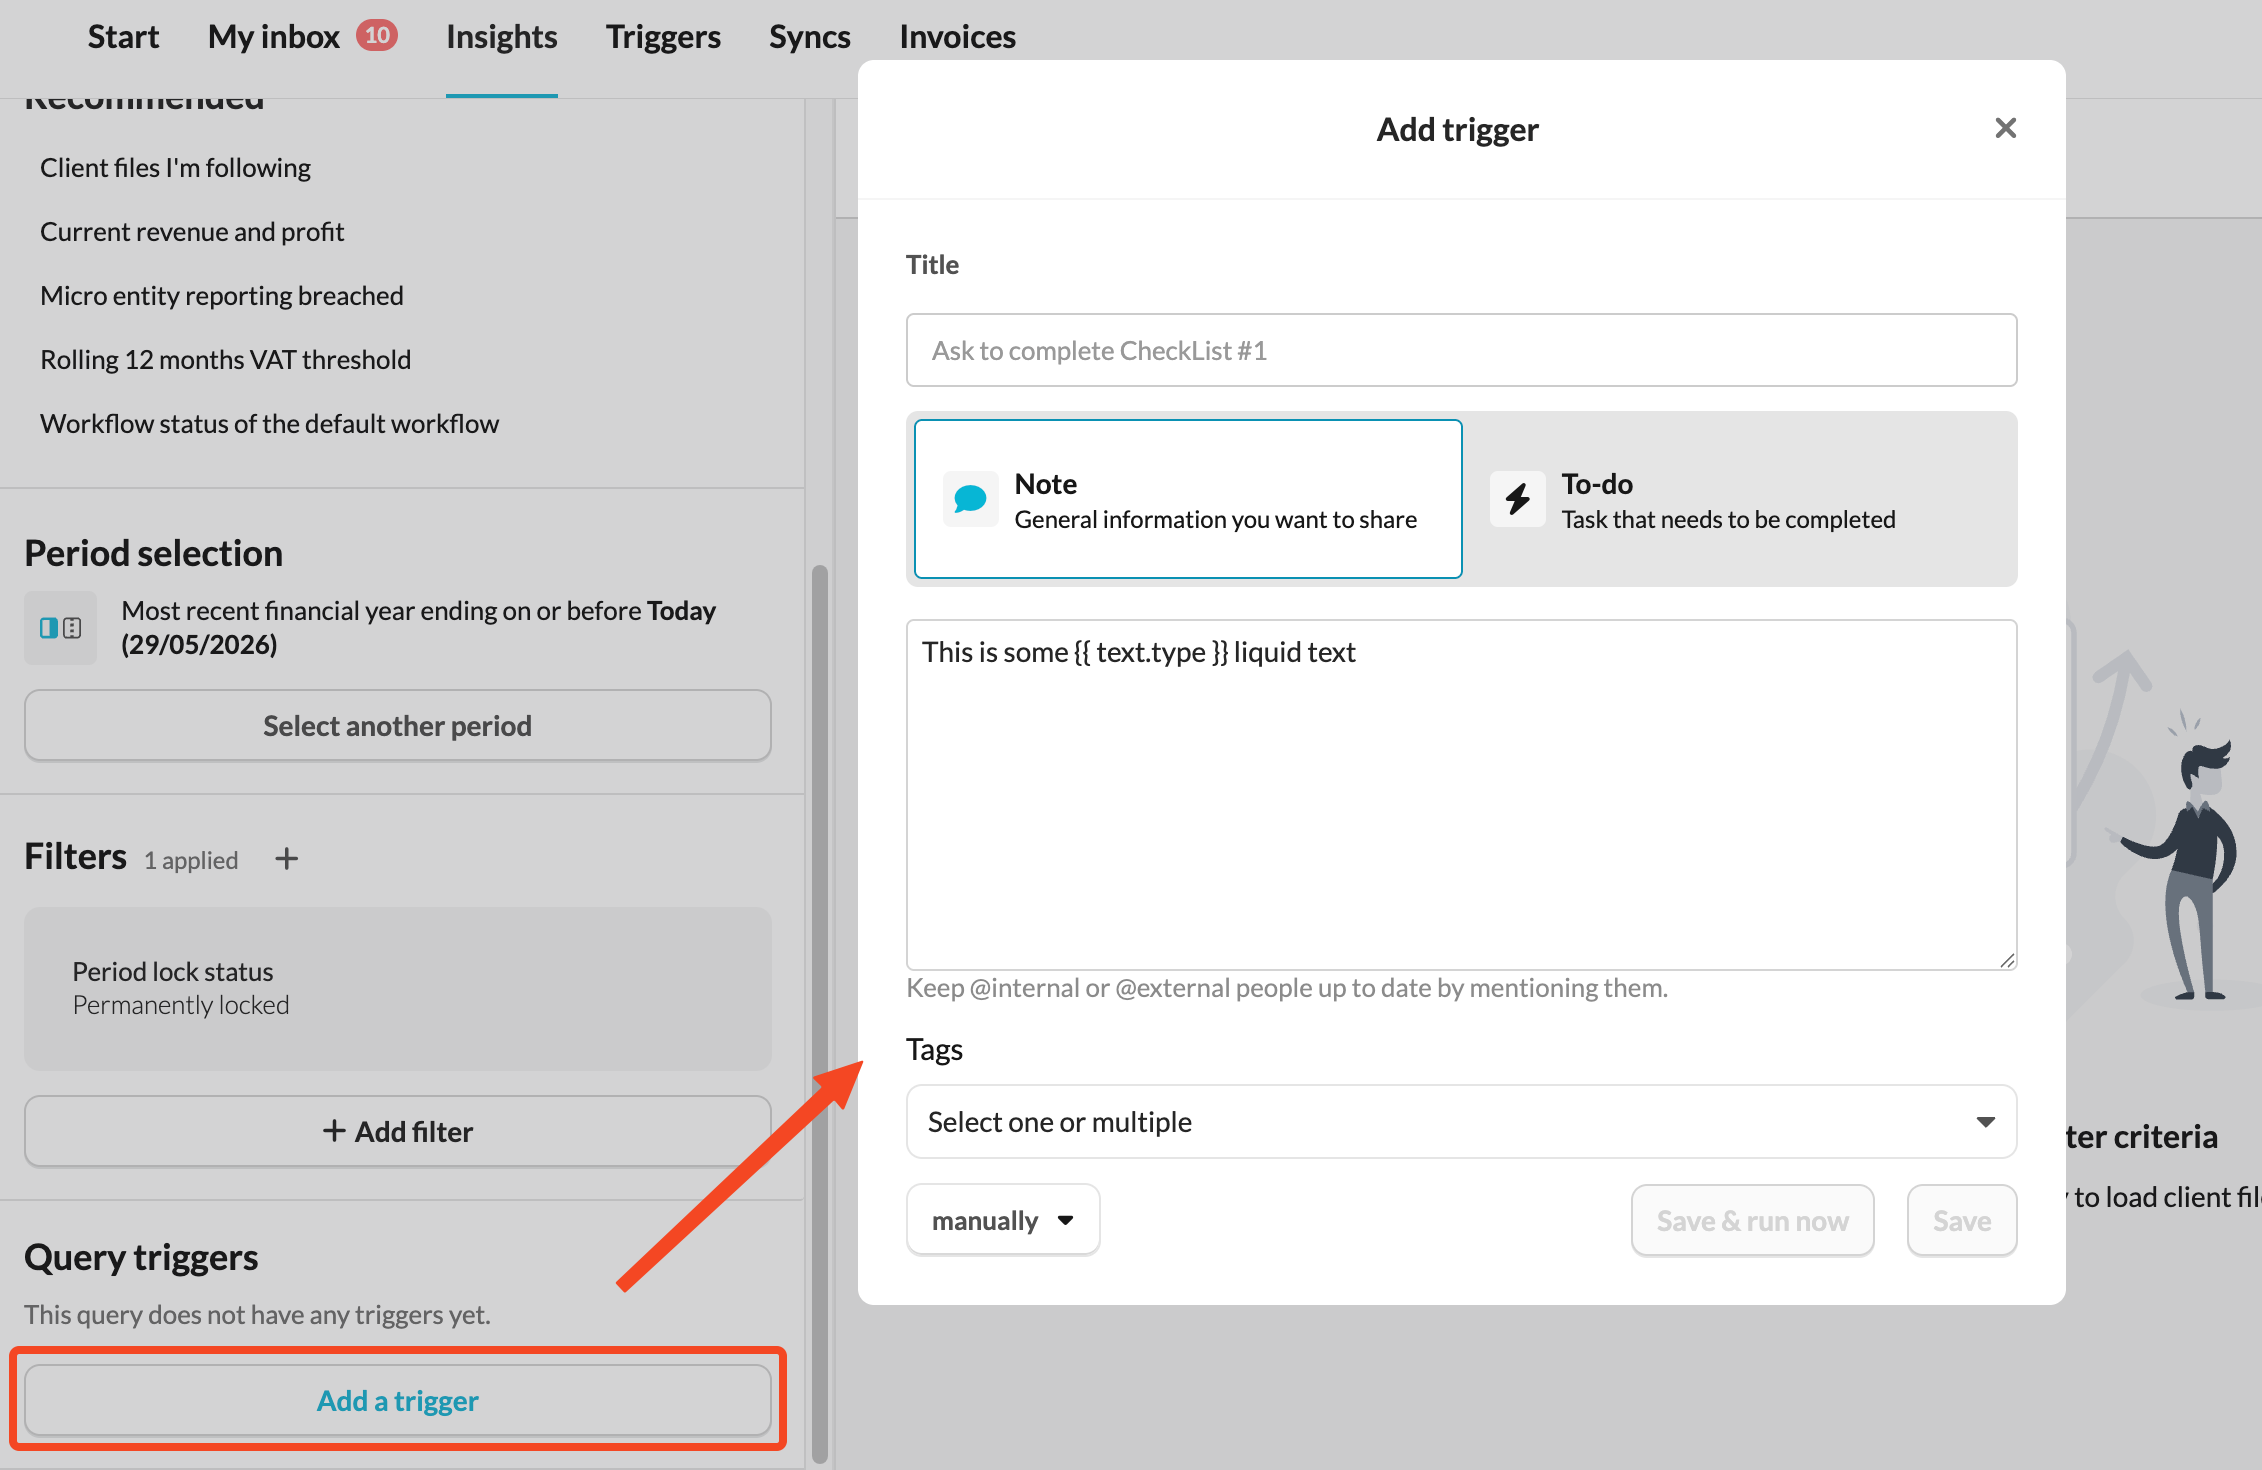
- Choose whether to create a Note or a To-do.
- Define the default text that will be displayed on the file for that period after the trigger is executed. You also have the option to add liquid code here. This enables you to make the text dynamic. For more information about liquid, you can consult our developers on the Silverfin Community.
- Select the frequency:
- Manual: you decide when to run it. Insights generates notes or To-dos only when you manually initiate this trigger.
- Daily: Silverfin runs it every day and creates notes or to-dos when new files meet the conditions.
Good to know:
- You can manually execute a trigger anytime from the Triggers overview by selecting Run once.

- You can tag notes using @internal, @external, or @everyone to control visibility. See the article about Communication in Silverfin for more details on tagging.
- To create a trigger based on the recommended query, you need to first make a copy of the query.

Where Do Notes and To-Dos Appear?
When a trigger runs, the generated notes or To-dos appear:
- In the Communication panel and Communication tab of each relevant file
- In the period where the query’s filters are met
- If you’re following the file and @internal tag is used or you are mentioned in the note, you’ll also receive a notification.
If you’re interested in activating Insights for your firm, please contact your Customer Success Manager.
They’ll guide you through the setup process, available features, and best practices for your region.