| User Roles |  Admin Admin |  Staff contributor Staff contributor |  External contributor External contributor |  Pulse user Pulse user |
This article explains what you see each time you sign in to Silverfin using Visma Connect once two-factor authentication (2FA) is already set up. It walks through the standard sign-in flow and what to do if your usual verification method is unavailable. It is written for users who have already completed 2FA enrolment.
Haven't set up 2FA yet? This article is only for users who have already migrated to Visma Connect and set up 2FA. If you are signing in for the first time and are asked to set up 2FA, follow the setup guide instead: How do I sign in to Silverfin for the first time after migrating to Visma Connect?
Table of contents
- How do I sign in to Silverfin with 2FA?
- Can I skip 2FA on a device I use regularly?
- What if I can't use my usual 2FA method?
- Frequently asked questions
How do I sign in to Silverfin with 2FA?
Because 2FA is required, Silverfin (via Visma Connect) always asks you to confirm your identity with a second step after your email and password are accepted. The first two steps are the same for everyone; the next steps depends on which authenticator app you registered during setup.
- Enter your email address. On the sign-in screen type your email address and click Next. You can tick Save my email address for next time, although we'd avoid this on public or shared computers.
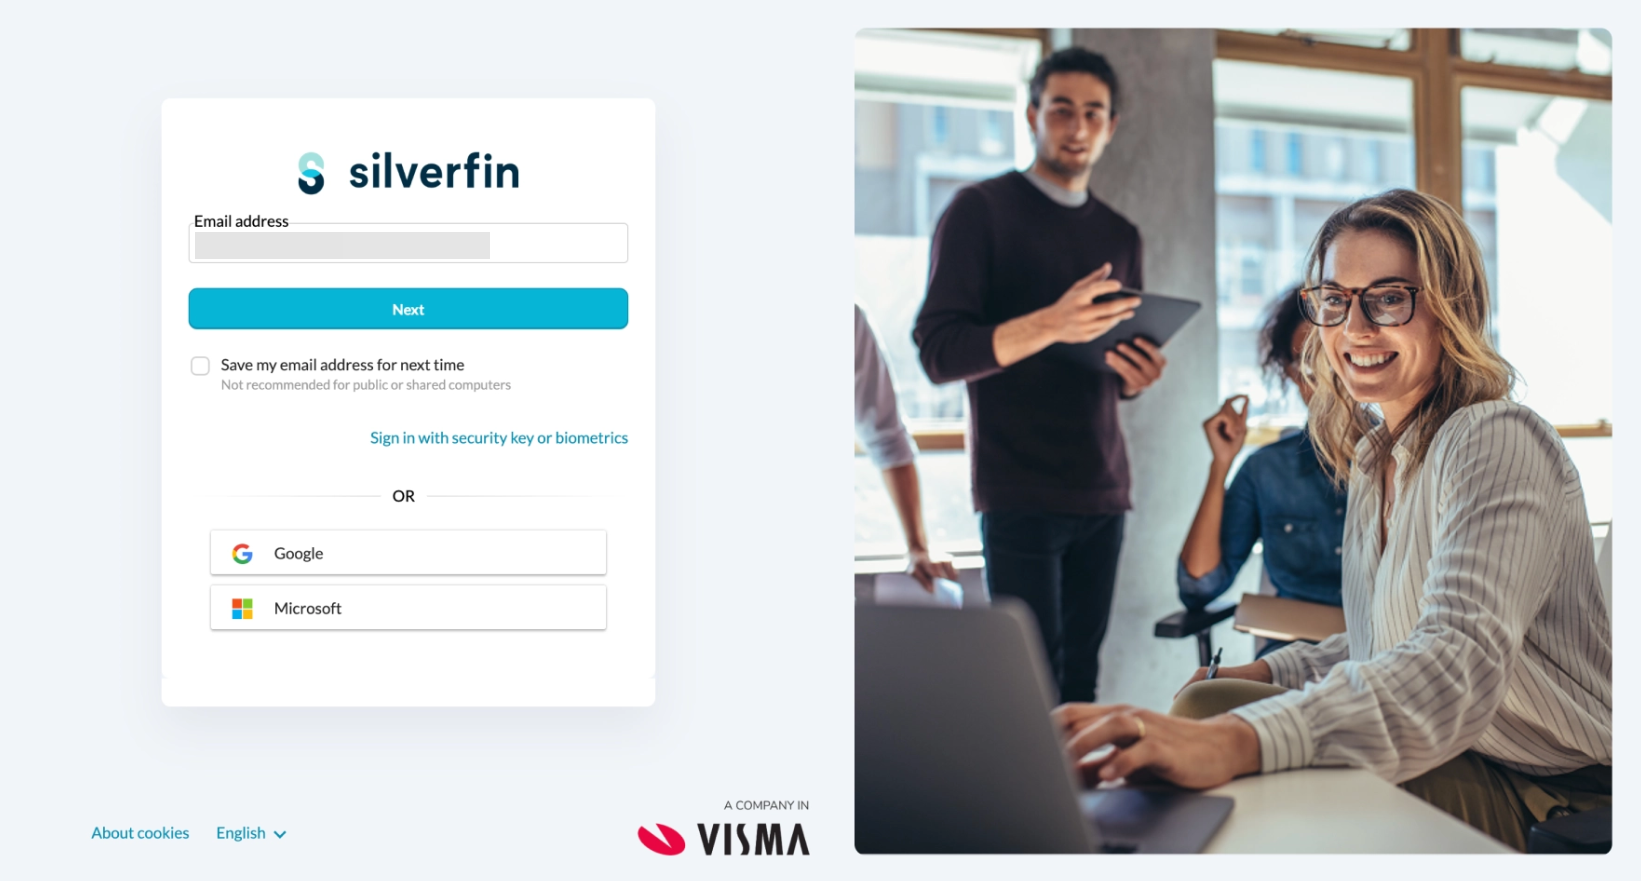
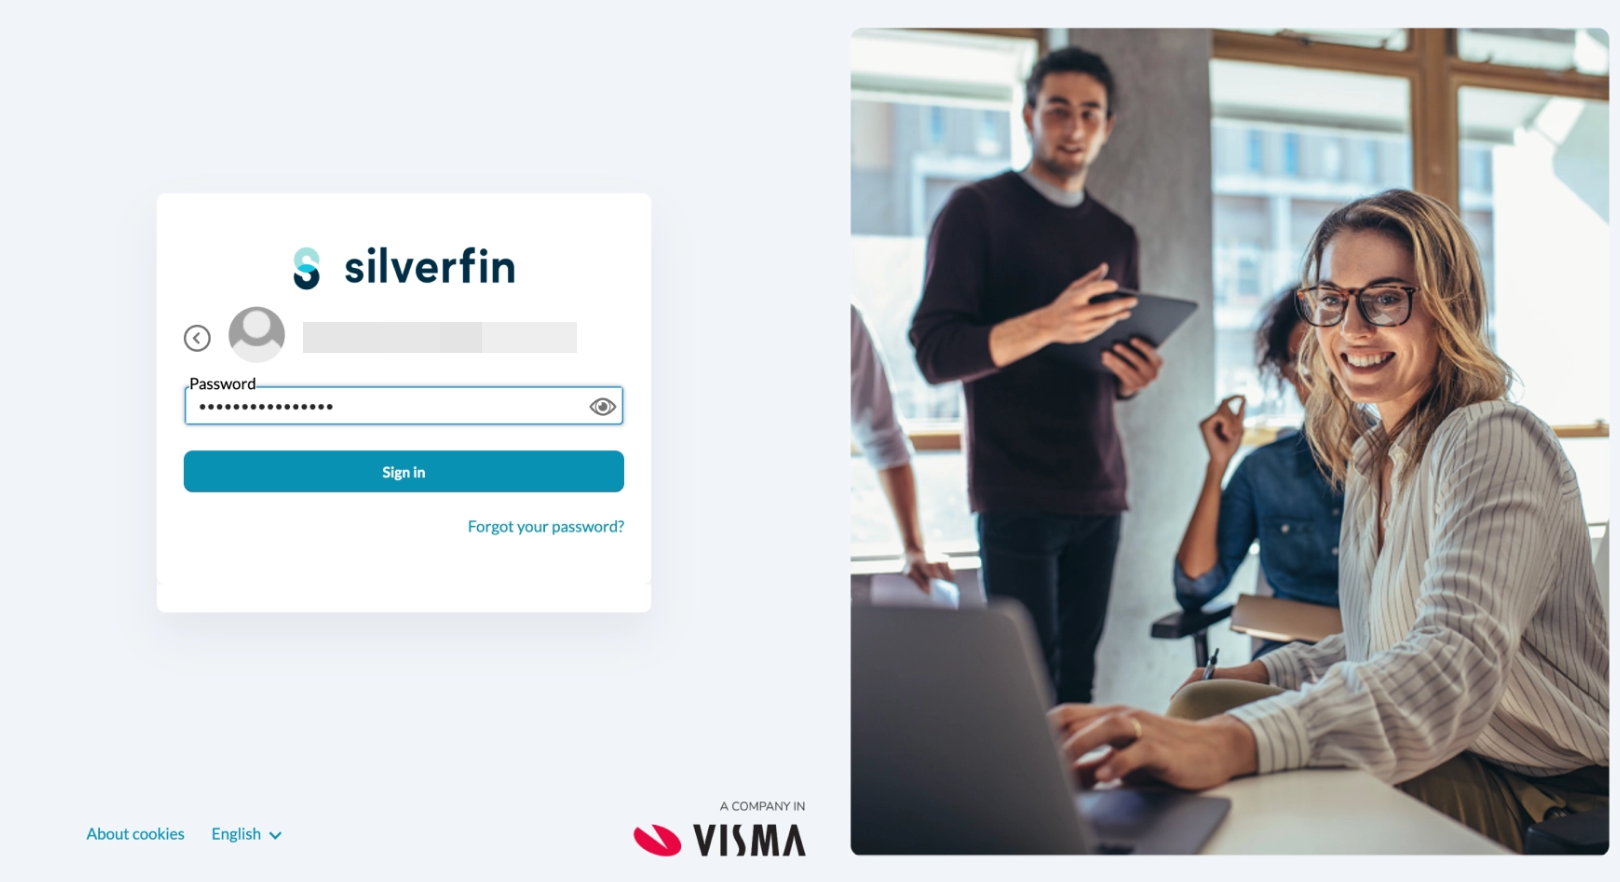
- Enter your password. Type your password and click Sign in. If you've forgotten it, use the Forgot your password? link to reset it.
- Complete the 2FA flow. Confirm your identity using the method you registered during setup (see the two options below).
- You're signed in. Once the challenge is satisfied, the browser takes you straight into Silverfin. No further action is needed.
If you use the Visma Authenticator app
- Visma Connect sends a push notification to your registered device. The browser shows a 2FA verification - We are waiting for your response screen.
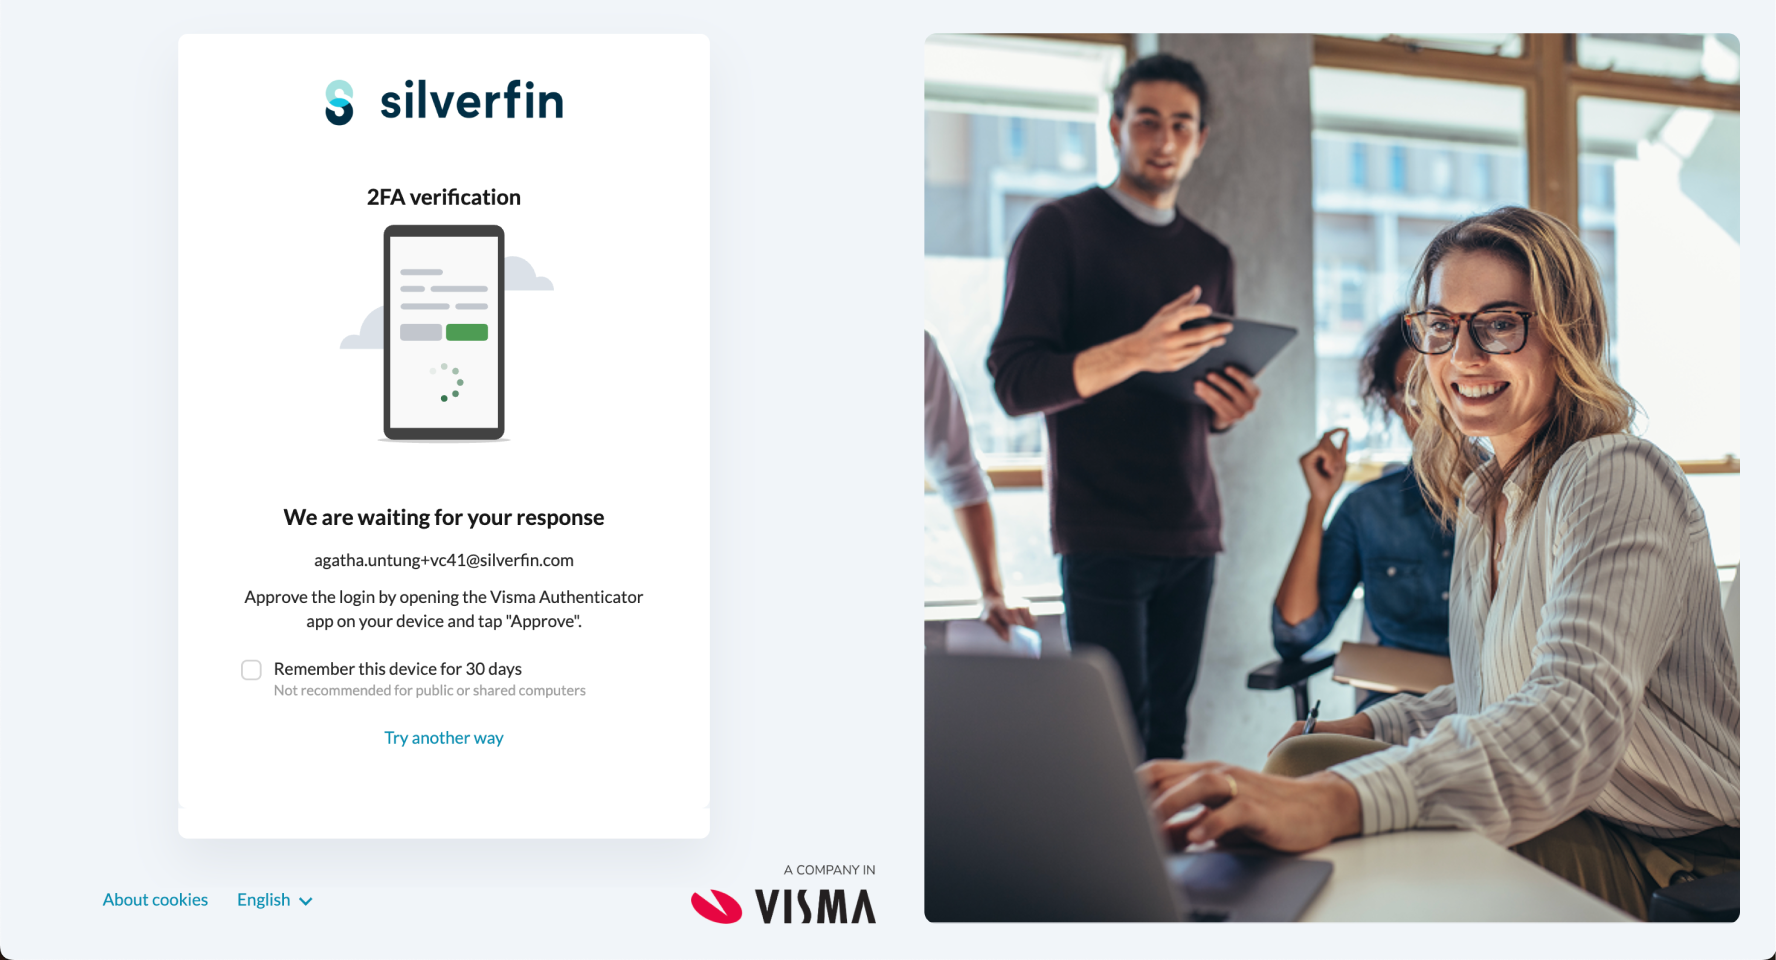
- Open the Visma Authenticator app on your phone and tap Approve to complete sign-in.
If you use another authenticator app (Google Authenticator, Microsoft Authenticator, Authy, 1Password, and similar)
These apps don't support push notifications, so you'll be asked to enter a code instead. Open your authenticator app, copy the current rotating 6-digit code, type it into the Enter your 6-digit code field, and click Verify.
Can I skip 2FA on a device I use regularly?
- Yes. On the 2FA screen, tick Remember this device for 30 days. On that browser, you won't be asked to complete the 2FA challenge again for the next 30 days.
- This option is hidden on public or shared computers, and it only applies to the current browser. On any other browser or device, or after 30 days, you'll be asked to complete 2FA again.
What if I can't use my usual 2FA method?
If your usual method is unavailable - for example your phone is discharged, has no signal, or the app has been removed - click Try another way on the 2FA screen to choose a different verification method.
The methods you see depend on what you set up during 2FA enrolment, so your list may differ from a colleague's. The table below shows when each option appears.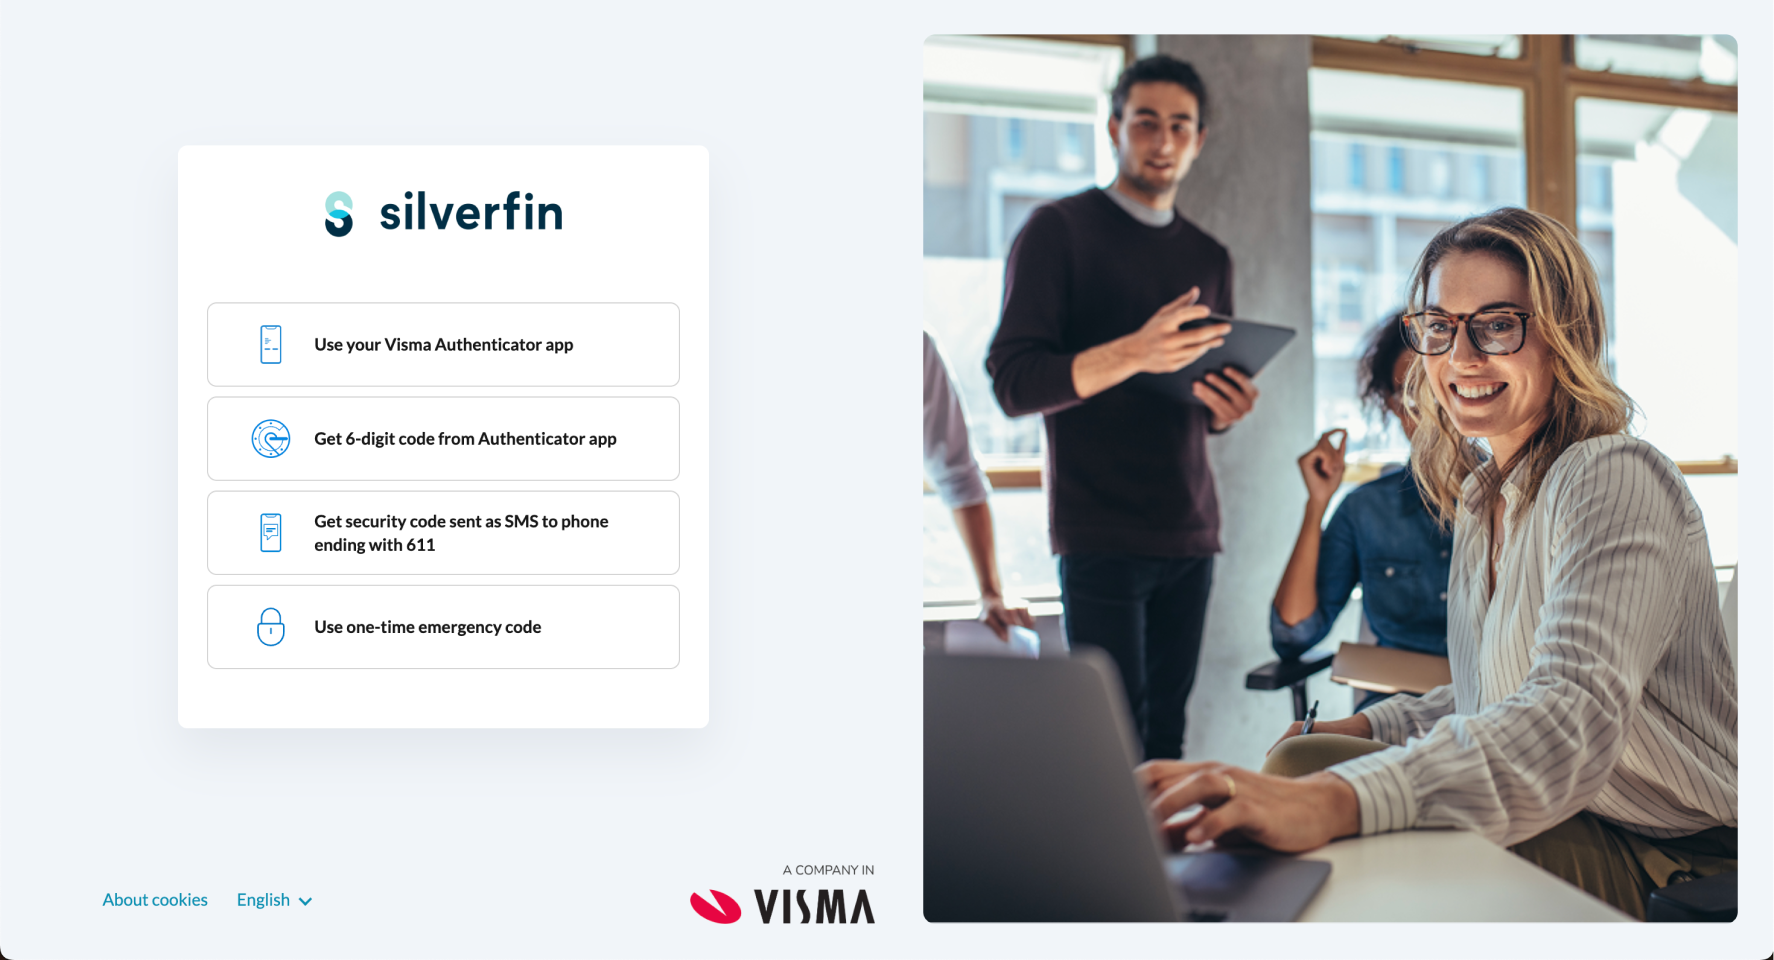
| Option | When it appears | What it does |
| Use your Visma Authenticator app | Only if you registered the Visma Authenticator app as your method. Not shown for other authenticator apps. | Re-sends the push notification to your device. Tap Approve in the app. |
| Get 6-digit code from Authenticator app | For anyone who registered an authenticator app, whichever brand (Visma, Google, Microsoft, Authy, 1Password, and similar). | Asks you to open your authenticator app, copy and type the current 6-digit code. |
| Get a security code by SMS | Only if you added a recovery phone number during setup. The last digits of the number are shown for confirmation. | Sends a 6-digit code by SMS, along with a reference number. Enter the code to verify. |
| Use a one-time emergency code | Always available to every user. | Lets you enter one of the emergency codes you saved during setup. Each code works once only. |
The one-time emergency code is the universal fallback — it's always available, even when you can't reach your authenticator app or your phone. For example, if you set up Google Authenticator without an SMS backup, "Try another way" will show just two options: the 6-digit code from your app, and your emergency code.
Frequently asked questions
Why do I see different "Try another way" options than my colleague?
The options depend on what each person set up during 2FA enrolment. Someone with an SMS backup sees the SMS option; someone without it does not. The one-time emergency code is always available to everyone.
I use Google Authenticator, not Visma Authenticator. Why is there no "Use your Visma Authenticator app" option for me?
That option relies on the Visma Authenticator's push-notification feature, so it only appears for users who registered that app. On other apps (Google Authenticator, Microsoft Authenticator, Authy, 1Password, and similar) you'll instead see Get 6-digit code from Authenticator app.
What is the reference number on the SMS screen for?
It confirms that the text message you received belongs to this sign-in attempt. If the reference number on screen doesn't match the one in your SMS, don't enter the code - it could point to a session mix-up or a phishing attempt.
Can I use the same emergency code twice?
No. Each emergency code is single-use. Once you've entered it successfully, it's used up.
Where do I get new emergency codes if I run out?
You can generate new codes in your account settings after signing in. If you can't sign in because you've run out of codes, contact Support.
Does "Remember this device for 30 days" turn off 2FA permanently?
No. It only skips the 2FA challenge on the current browser for 30 days. After that, or on any other browser or device, you'll need to complete the full 2FA challenge again.